
Fastly Compute Proxy integration
Fingerprint Fastly Compute Proxy Integration is responsible for proxying identification and agent-download requests between your website and Fingerprint through your Fastly infrastructure. Your website does not strictly need to be behind Fastly to use this proxy integration, although that is optimal for maximum accuracy benefits.
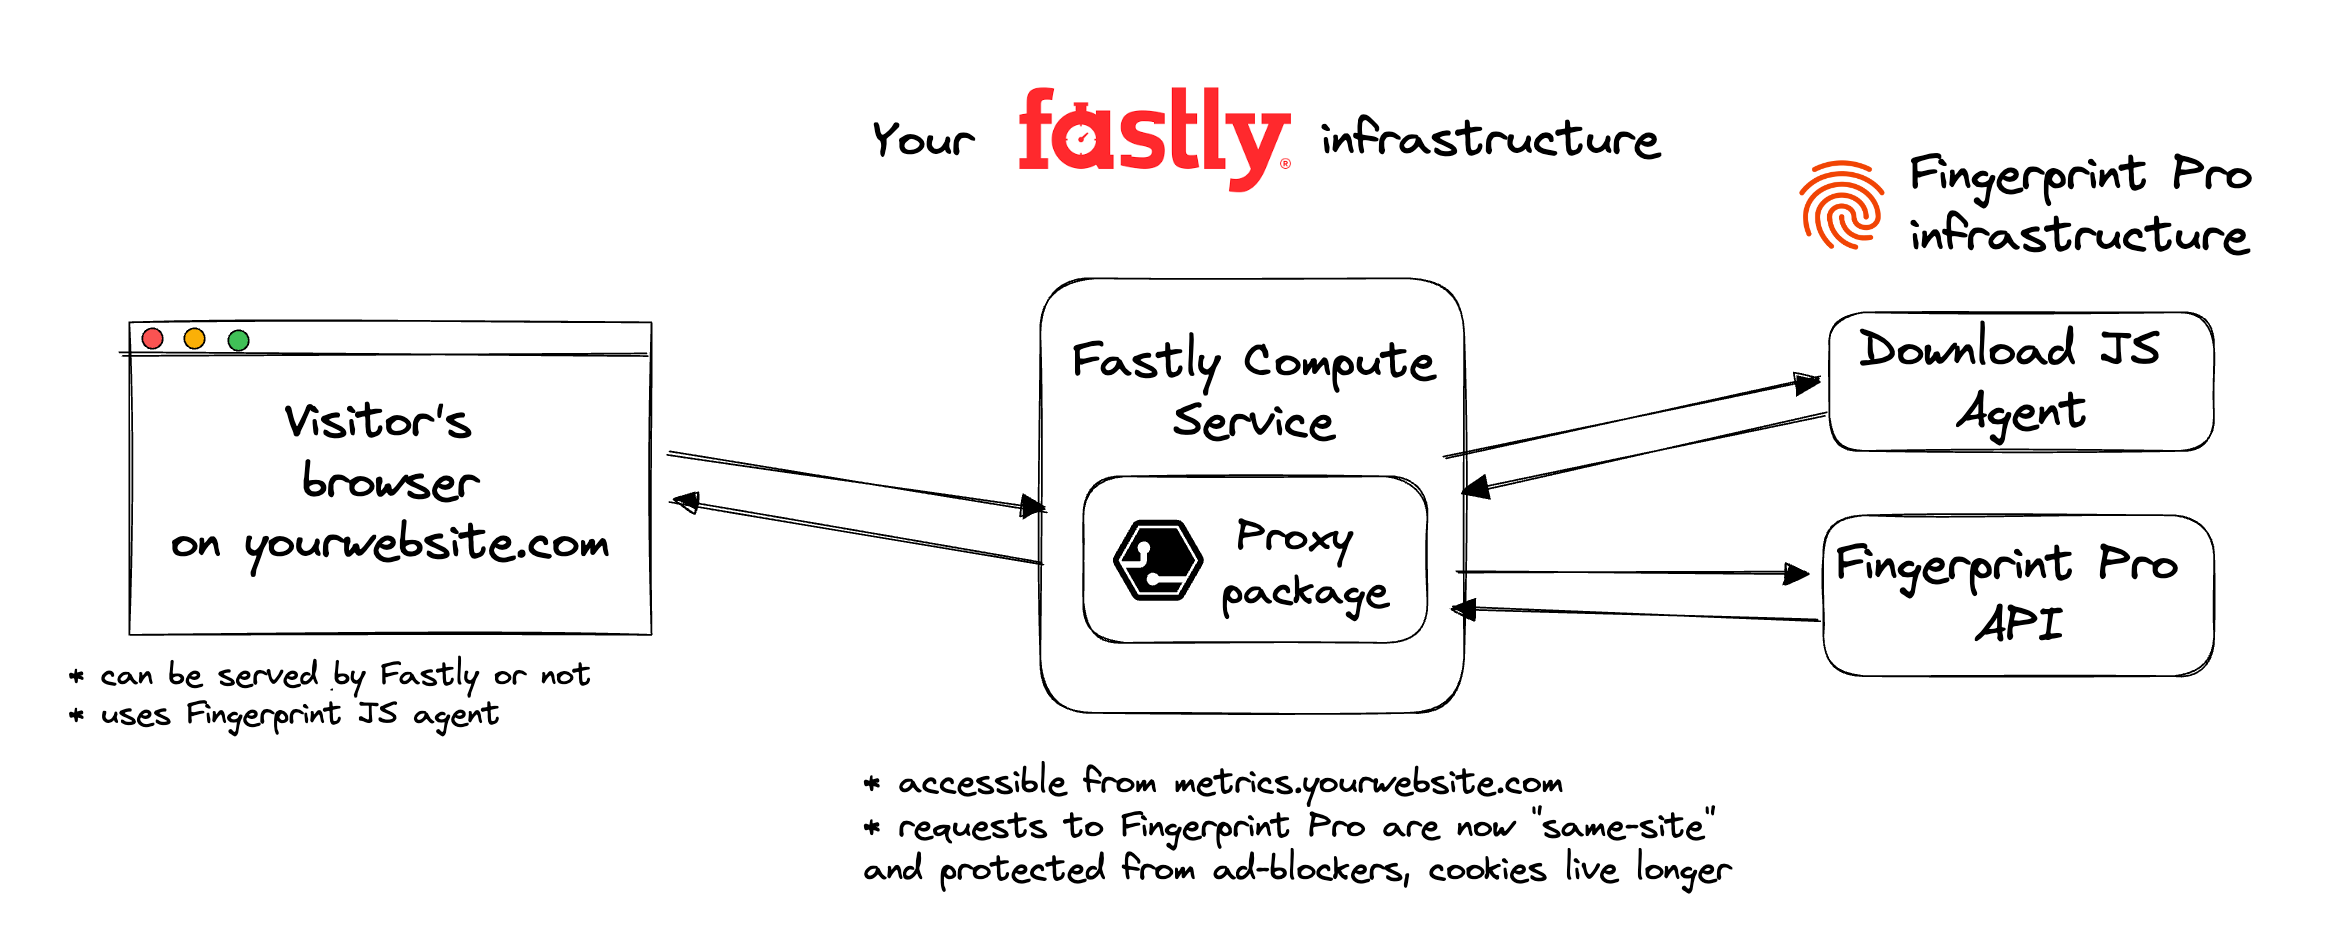
The integration is a JavaScript WebAssembly Compute Service you can deploy to your Fastly account. The source code is available on GitHub.
Limitations and expectations
Integration in BetaThis integration is currently in Beta. If you find any issues, please contact our support team.
Limited to Enterprise planSupport for the Fastly Compute Proxy Integration is provided only for customers on the Enterprise Plan. Other customers are encouraged to use Custom subdomain setup or Cloudflare Proxy Integration.
Manual updates occasionally requiredThe underlying data contract in the identification logic can change to keep up with browser and device releases. Using the Fastly Compute Proxy Integration might require occasional manual updates on your side. Ignoring these updates will lead to lower accuracy or service disruption.
The benefits of using the Fastly Compute Proxy Integration
- Significant increase in accuracy in browsers with strict privacy features, such as Safari or Firefox.
- Cookies are now recognized as “first-party.” This means they can live longer in the browser and extend the lifetime of visitor IDs.
- Ad blockers will not block the Fingerprint JavaScript agent from loading. Requests to Fingerprint domains are stopped by most ad blockers, but requests to same-site URLs are always allowed.
- Ad blockers will not block Fingerprint identification requests since they are sent to a subdomain that belongs to the same site.
- Insight and control over the identification requests that can be combined with other Fastly features like Compute and traffic reports.
- Cookie security: Fastly Compute Proxy Integration drops all the cookies sent from the origin website. The code is open-source, so you can transparently verify this behavior.
- Easy to meet compliance and auditing requirements.
Integration setup overview
The integration setup consists of the following three steps. Each step is described in detail below.
- Issue a proxy secret in the Fingerprint dashboard.
- Create integration path variables.
- Deploy Fingerprint proxy integration Compute service in your Fastly account.
- Configure the Fingerprint client agent on your website or mobile app.
Step 1: Create a Fingerprint proxy secret
Issue a Fingerprint proxy secret to authenticate requests from your Fastly infrastructure.
- Go to the Fingerprint dashboard and select your workspace.
- In the left menu, click API keys.
- Click Create Proxy Key.
- Give it a name, for example,
Fastly Compute proxy integration. - Optionally, you can choose an environment for the proxy secret.
- By default, the proxy secret works for all environments in your workspace.
- A proxy secret scoped to a specific environment can only authenticate identification requests made with a public API key from the same environment.
- Click Create API Key.
You will use the proxy secret value in the following steps, so store it somewhere safe.
Step 2: Create path variables
You need to set the path variables you will use throughout your Fastly configuration and the JavaScript agent configuration on your website (Step 4). These values are arbitrary. Just decide what your values are and write them down somewhere.
In this guide, we will use readable values corresponding to the variable names to make it easier to follow:
AGENT_SCRIPT_DOWNLOAD_PATH="AGENT_SCRIPT_DOWNLOAD_PATH"
GET_RESULT_PATH="GET_RESULT_PATH"
However, your values used in production should look more like random strings:
AGENT_SCRIPT_DOWNLOAD_PATH="vbcnkxb654"
GET_RESULT_PATH="5yt489hgfj"
That is because some adblockers might automatically block requests from any URL containing fingerprint-related terms like "fingerprint", "fpjs", "track", etc. Random strings are the safest. So whenever you see a value like AGENT_SCRIPT_DOWNLOAD_PATH in this guide, you should use your random value instead.
Step 3: Deploy the proxy integration Compute service
You can choose from two available installation methods.
Using Terraform
If you manage your infrastructure using Terraform, you can use the official Fastly Compute Proxy Integration Terraform module. This is the recommended method for deploying the integration. It provides a streamlined, versioned setup with fewer manual steps.
Continue to Deploy Fastly Compute Proxy integration using Terraform.
Deploying Manually
If you don’t use Terraform, you can manually deploy the integration using the Fastly web interface. This method requires more manual steps.
If you prefer the manual installation method, continue to Deploy Fastly Compute Proxy integration manually.
Step 4: Configure the Fingerprint client agent to use your service
- Use the path variables created in Step 2 to construct the script download and identification endpoint URLs.
- Configure the Fingerprint client agent on your website or mobile app accordingly:
// The same pattern applies to React SDK, Vue SDK, etc.
import * as FingerprintJS from "@fingerprintjs/fingerprintjs-pro";

const fpPromise = FingerprintJS.load({
  apiKey: PUBLIC_API_KEY,
  scriptUrlPattern: [
    "https://metrics.yourwebsite.com/AGENT_SCRIPT_DOWNLOAD_PATH?apiKey=<apiKey>&version=<version>&loaderVersion=<loaderVersion>",
    FingerprintJS.defaultScriptUrlPattern, // Fallback to default CDN in case of error
  ],
  endpoint: [
    "https://metrics.yourwebsite.com/GET_RESULT_PATH?region=us",
    FingerprintJS.defaultEndpoint, // Fallback to default endpoint in case of error
  ],
});
const fpPromise = import(
"https://metrics.yourwebsite.com/AGENT_SCRIPT_DOWNLOAD_PATH?apiKey=PUBLIC_API_KEY"
).then((FingerprintJS) =>
FingerprintJS.load({
endpoint: [
"https://metrics.yourwebsite.com/GET_RESULT_PATH?region=us",
FingerprintJS.defaultEndpoint, // Fallback to default endpoint in case of error
],
}),
);
Parameter URL nuances
- Note that the import
urlfor the CDN installation method andscriptUrlPatternused by NPM packages are similar but different and cannot be used interchangeably.- Pay attention to differences in query parameters:
- Pass region to the
endpointparameters in the following format:?region=eu. The value needs to reflect the region of you application.- Leave the
scriptUrlParamparameter as displayed here:?apiKey=<apiKey>&version=<version>&loaderVersion=<loaderVersion>. TheapiKeyversionandloaderVersionparameters will be replaced by the values in the NPM package automatically. Do not alter them manually.
If everything is configured correctly, you should receive the latest Fingerprint client-side script and the identification result through your Fastly Compute proxy integration.
Monitoring and troubleshooting the integration
You can go to the integration's status page at /status (for example https://metrics.yourwebsite.com/status) to check that the integration is running and all required configuration variables have been set correctly.
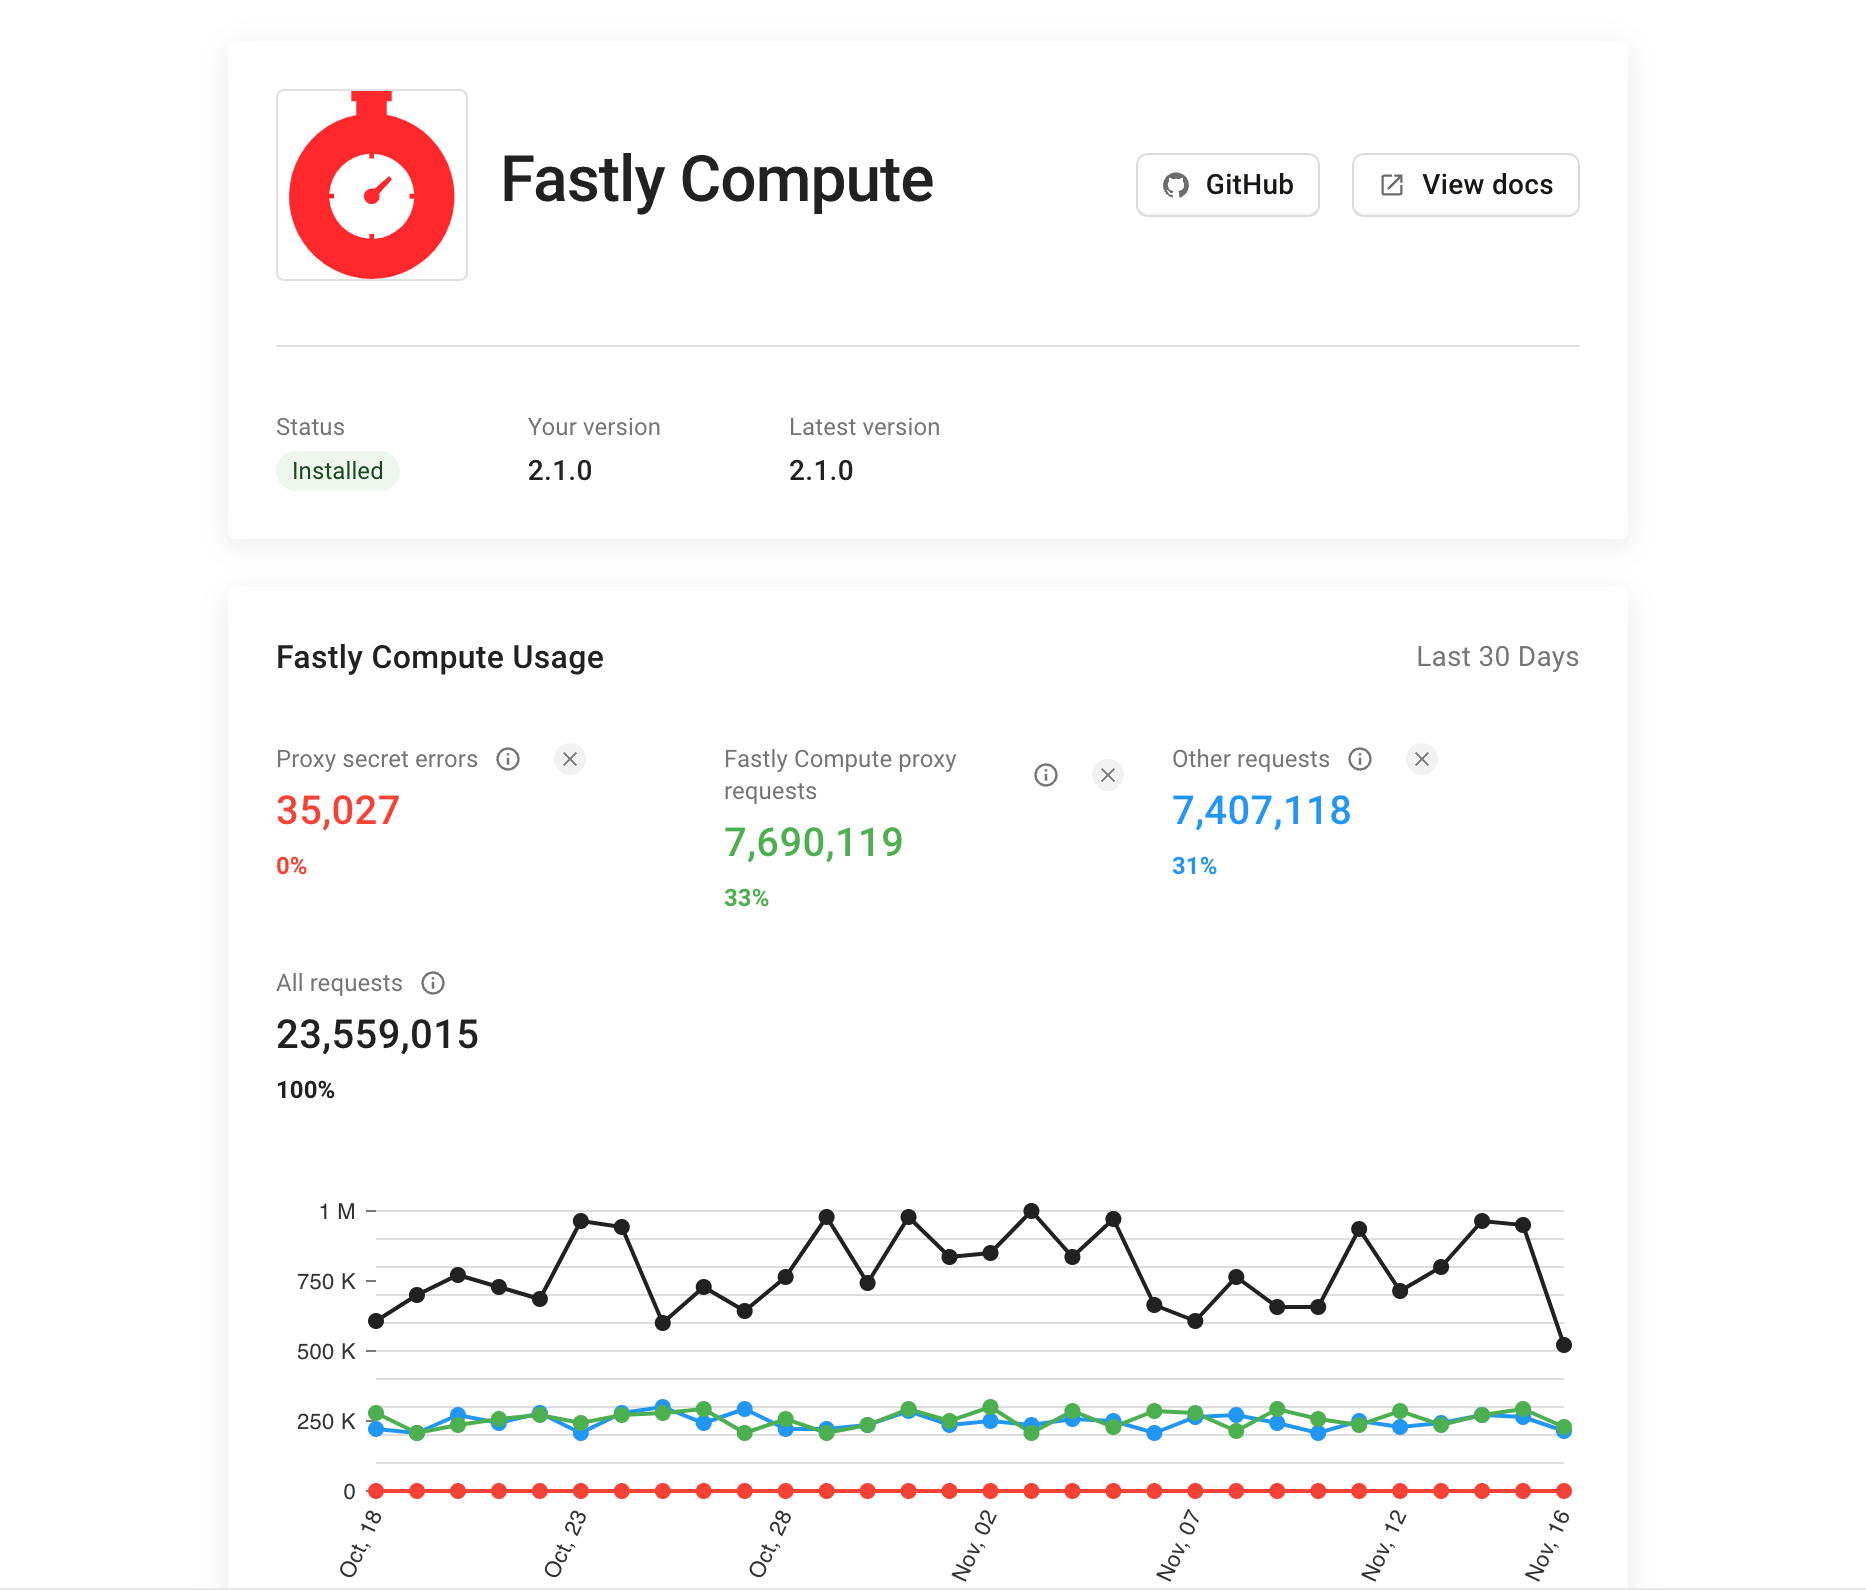
Inside your Fingerprint Dashboard, go to SDKs & integrations > Fastly Compute to see the usage metrics of your integration. Here you can monitor:
- If the integration is up to date.
- How many identification requests are coming through the integration (and how many are not).
- The error rate of proxied identification requests (caused by missing or incorrect proxy secret).
The information on the status page is cached so allow a few minutes for the latest data points to be reflected.
If you have any questions, reach out to our support team.
Fastly logging
If your integration isn't working as expected, it can be useful to look at the Fastly Compute service logs. Fastly offers a variety of logging options and integrations.
For simple debugging purposes, we recommend using Fastly log-tail:
- Install and configure the Fastly CLI on your machine.
- Run
fastly log-tail --service-id <SERVICE_ID>to see a stream of log messages from the integration Compute service.
Keeping your integration up to date
The Fastly Compute proxy integration does not update automatically. To stay current:
- If you're managing your integration manually, regularly check the GitHub Releases page and follow the manual deployment stepshttps://dev.fingerprint.com/docs/deploy-fastly-compute-manually#step-36-deploy-the-proxy-package-and-activate-your-service to update your service package when needed.
- If you're using Terraform, refer to the Terraform deployment guide to redeploy your package after reviewing the latest release.
If there is a new major version or another reason you need to update your integration, our support team will get in touch with you.
Cost Calculation
The resources required by the proxy integration fit within the Fastly Free Tier:
- The integration uses 2-4 out of the 5 available Origins per Compute Service.
- The integration uses 2 out of the 100 available Config Store Items.
- By default, the integration uses 200 out of the 1000 theoretically available connections per Compute service. Please contact our support team if you need to configure this value.
For more details on limitations affecting your setup see Compute resource limits.
Using Open client response
Enabling Open client response for your Fingerprint workspace allows you to access the full deobfuscated device intelligence result in your proxy integration. This lowers latency and increases the security of your Fingerprint implementation.
- To learn more, see Open client response.
- To implement Open client response in your Fastly Compute integration, see Using Open client response with Fastly Compute proxy integration plugins.
Updated about 1 month ago