
Quick Start Guide
How to quickly add Fingerprint device intelligence to your website or mobile app.
Fingerprint is a device intelligence platform that helps businesses protect their applications from fraud, account takeover, spam, bots, and other malicious activity. Fingerprint capabilities include:
- Visitor identification: Recognize returning browsers and mobile devices with industry-leading accuracy, without relying on cookies or IP addresses. Every visitor gets a visitor ID like
e0srMXYG7PjFCAbE0yIHthat cannot be deleted, lasts much longer than a cookie, and stays the same even if the visitor uses incognito mode or a VPN. - Smart signals: Detect suspicious device configurations like bots, VPN users, tampered browsers, or jailbroken phones with our actionable device intelligence insights.
In this guide, we will quickly get you started identifying your visitors using Fingerprint so you can test it out yourself. If you would like a practical demo of Fingerprint capabilities first, see our Playground or explore Use cases. If you want a deeper understanding of our platform, see Introduction.
1. Create an account
- Sign up for your free trial to get started, no credit card is required.
- You can choose to store all your Fingerprint data in the United States, Germany, or India. See Regions for more information.
Having trouble accessing the Dashboard?
Please make sure the following domains are allowed in your Firewall:
https://fingerprint.comhttps://*.fingerprint.comhttps://api.fpjs.pro
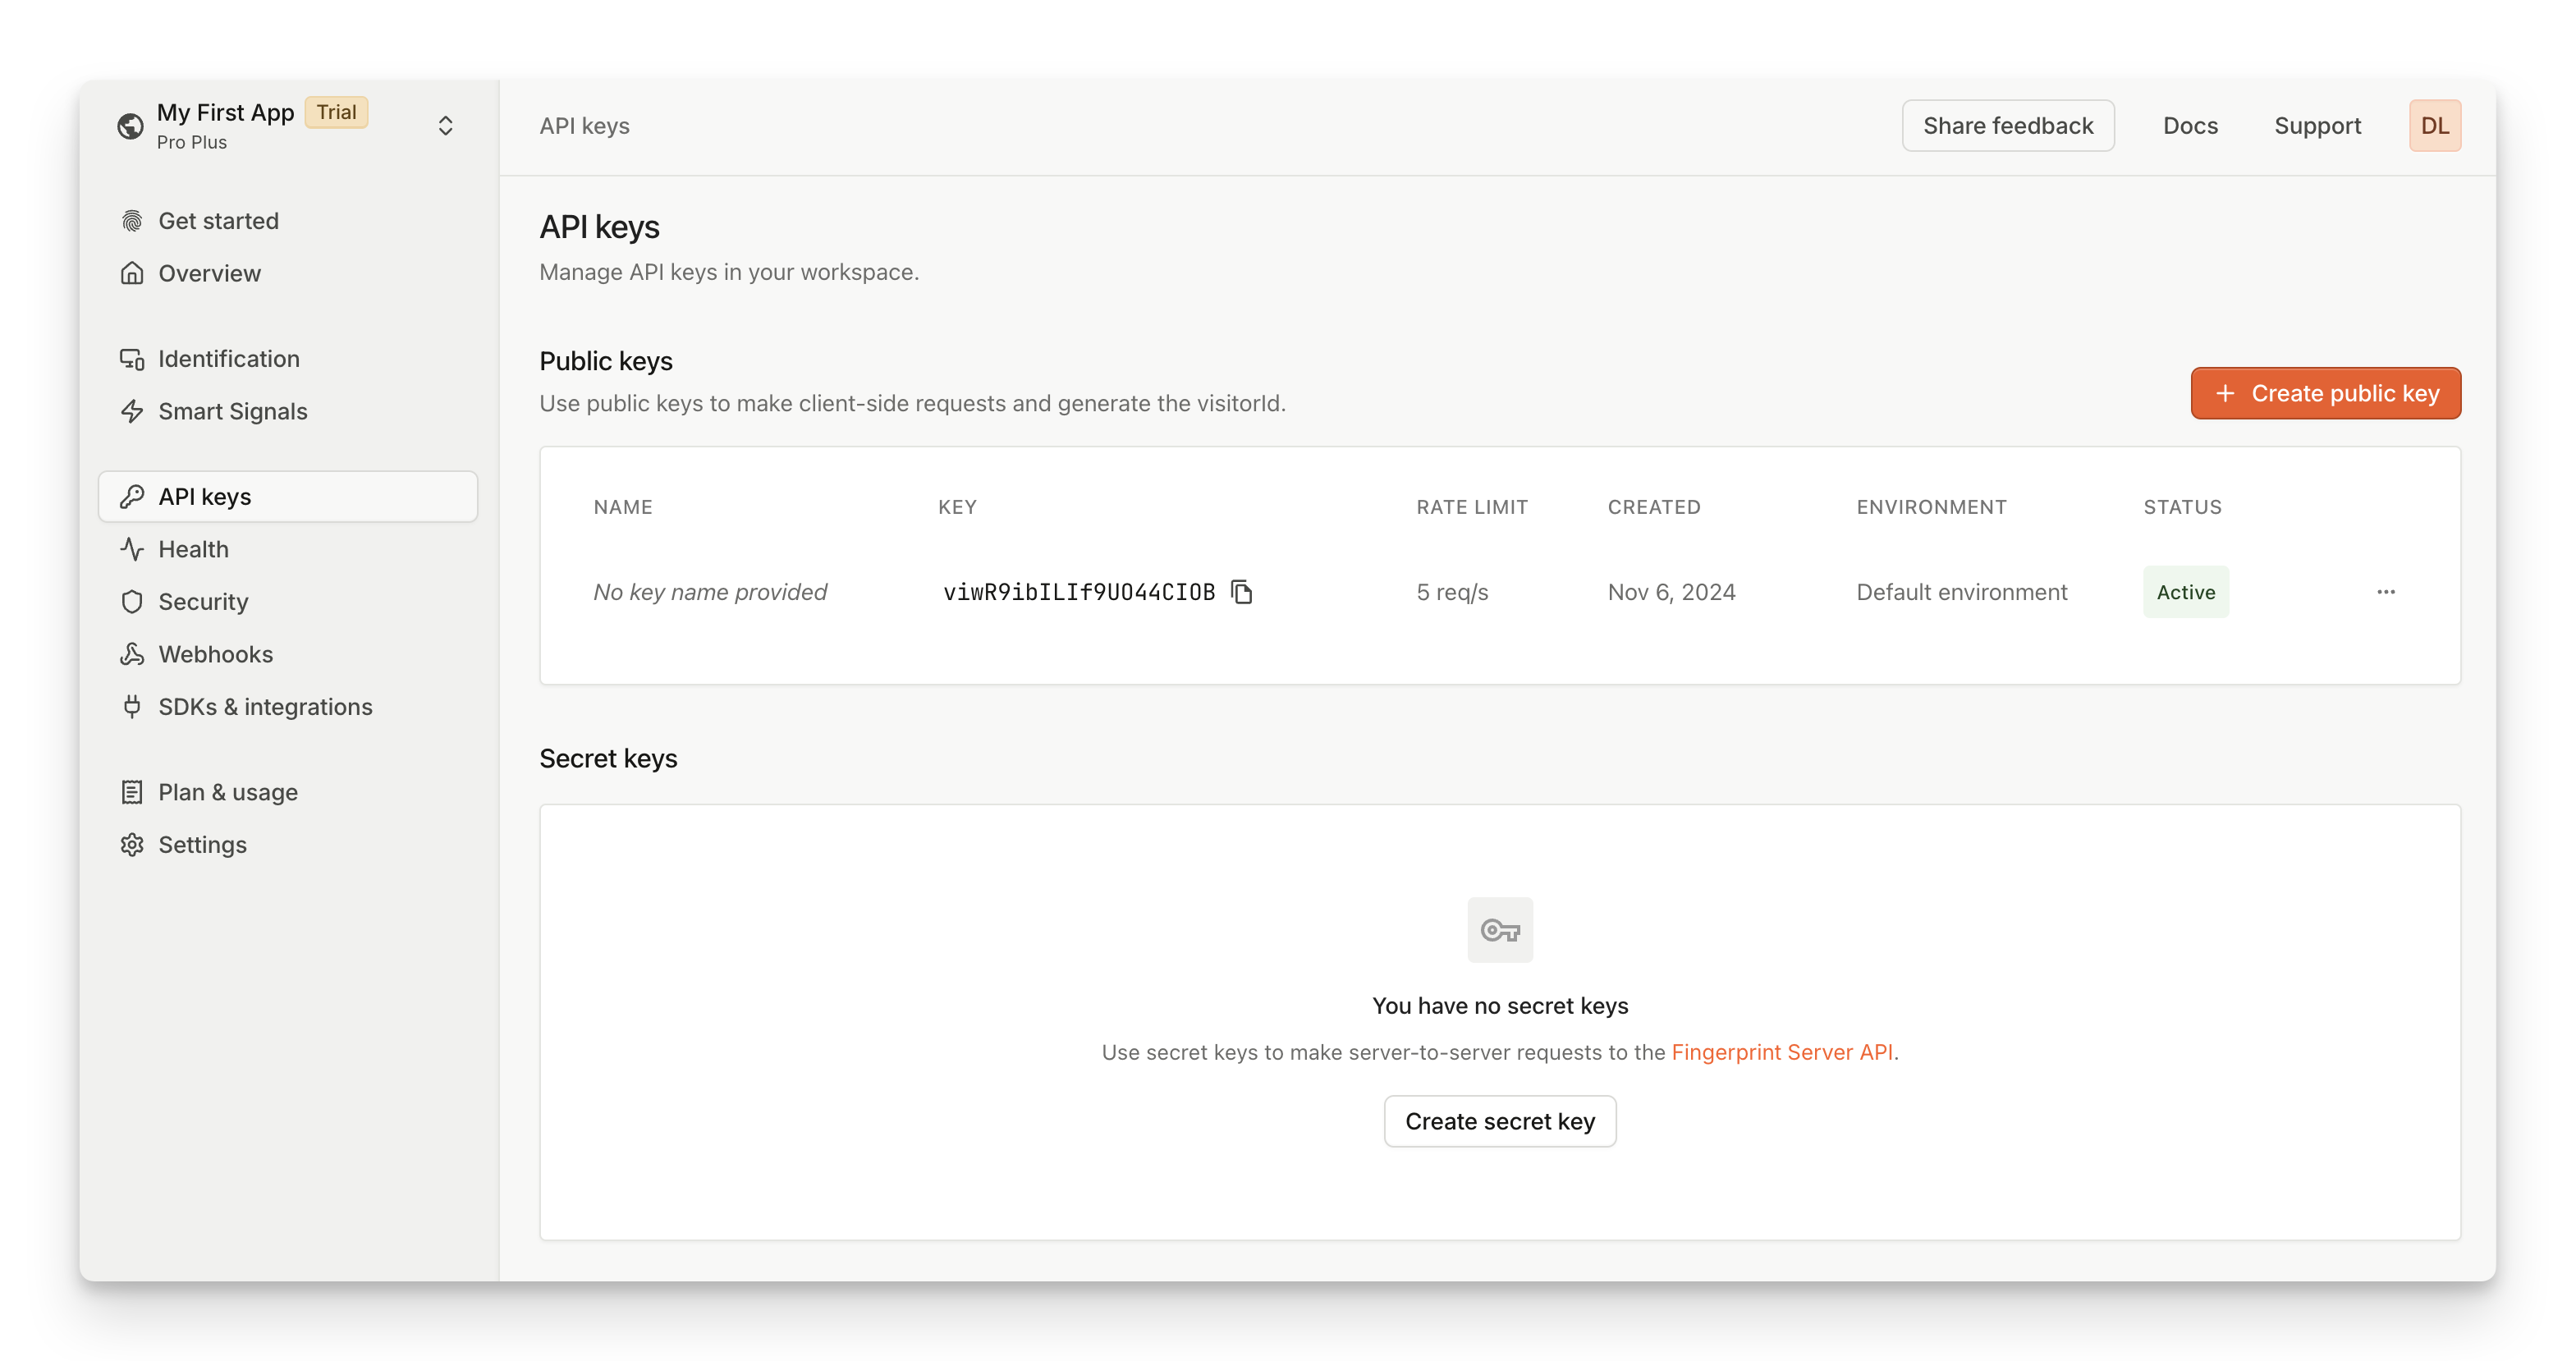
2. Get your API Key
- In the Dashboard, navigate to API Keys in the left-hand menu.
- Under Public Keys, copy or save your public API key to run the examples below.
If you've just created your account, please allow a minute or two for your API key to propagate before using it.
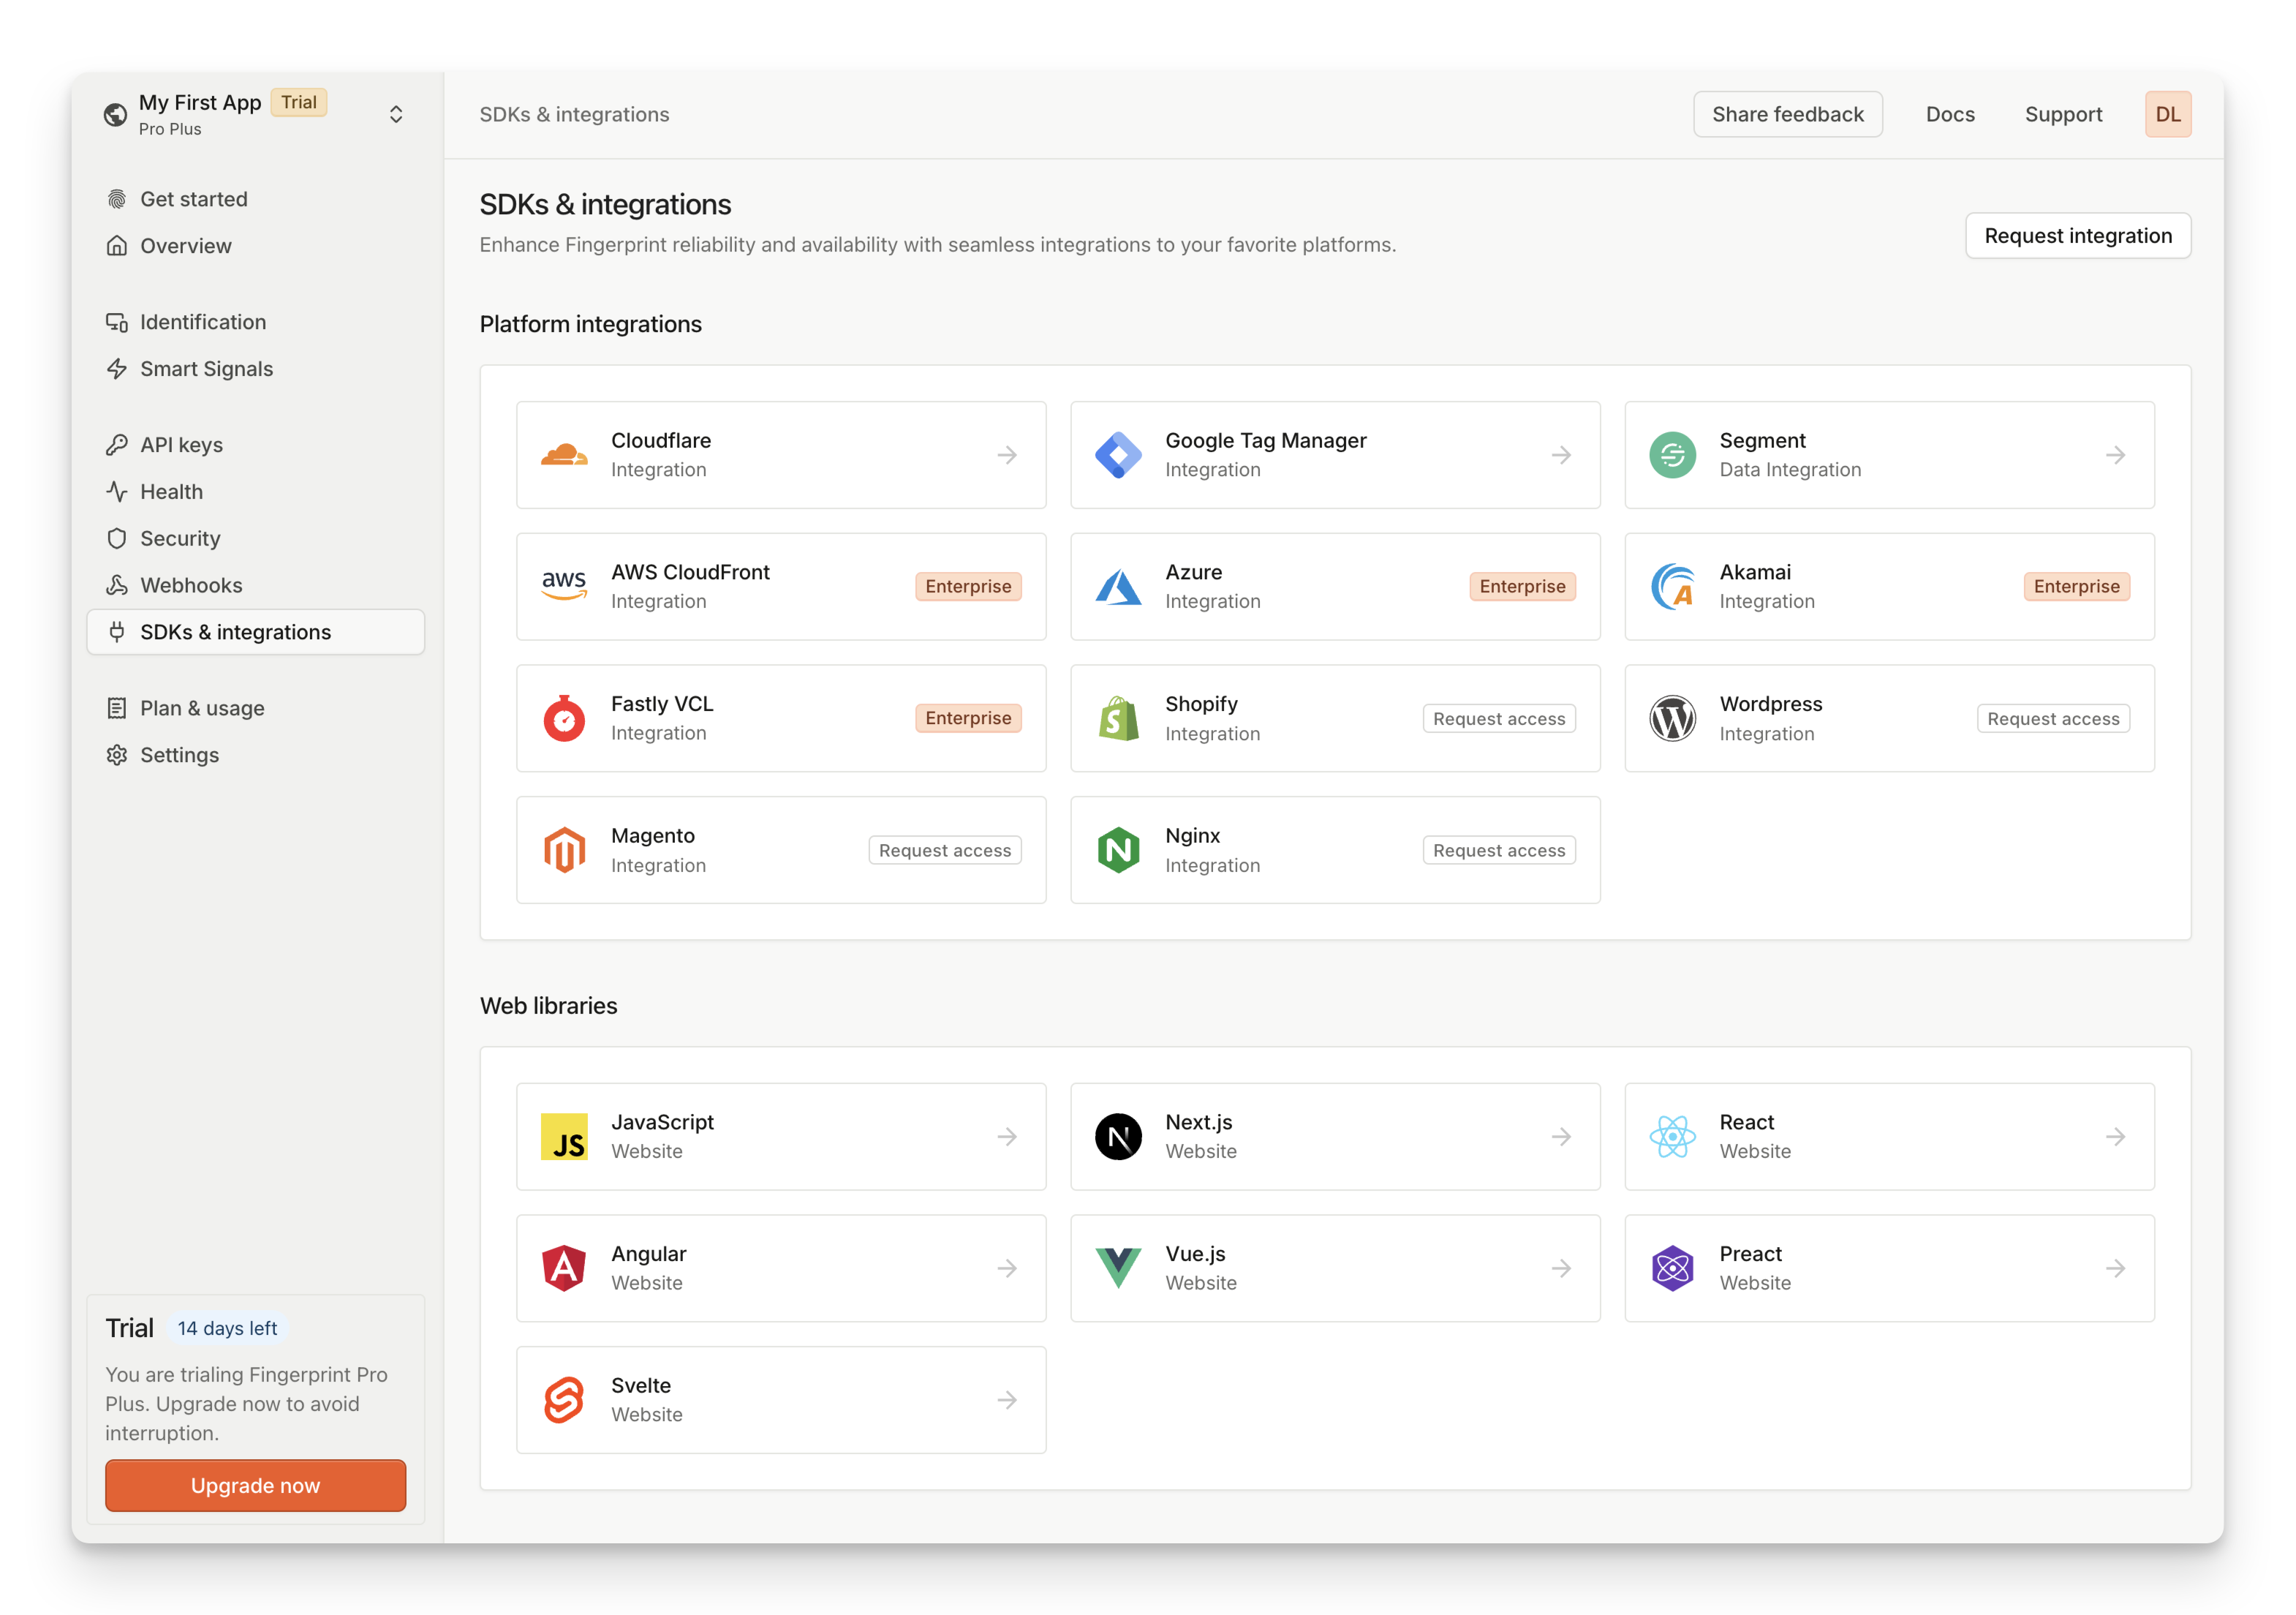
3. Add the client-side agent
Once you've created your account and got your public API key, you can add the JavaScript agent to your website or add a native SDK to your iOS or Android app. The agent collects browser or device attributes, sends them to the Fingerprint backend, and receives a visitor ID for that browser or mobile device.
The easiest way to add the agent is by going to the SDKs & integrations page and picking your preferred web or mobile library.
For example, you can install the JavaScript agent loader as an NPM package:
npm install @fingerprintjs/fingerprintjs-proyarn add @fingerprintjs/fingerprintjs-proOr you can add the JavaScript agent directly into your HTML using our CDN.
<script>
  // Initialize the agent at application startup.
  // Some ad blockers or browsers will block Fingerprint CDN URL.
  // To fix this, use a custom subdomain or a proxy integration.
  // (see info box below)
  const fpPromise = import('https://fpjscdn.net/v3/<<browserToken>>')
    .then(FingerprintJS => FingerprintJS.load({ region: "us" }));

  // Get the visitor identifier when you need it.
  fpPromise
    .then(fp => fp.get())
    .then(result => console.log(result.visitorId, result.requestId));
</script>
import FingerprintJS from '@fingerprintjs/fingerprintjs-pro'
// Initialize an agent at application startup.
const fpPromise = FingerprintJS.load({
apiKey: '<<browserToken>>',
region: 'us',
})
// Get the visitor identifier when you need it.
fpPromise
.then(fp => fp.get())
.then(result => console.log(result.visitorId, result.requestId))Note: Each workspace exists in a specific region. If you have chosen Europe or Asia as your data region, you must specify the
regionoption aseuorapin your agent configuration to match your workspace.
Every identification request will return a unique visitorId value for the current visitor. For more information, see the JavaScript agent API Reference, Android, or iOS guide.
Working with ad blockers and privacy-focused browsersRequests from client agents to Fingerprint APIs are often blocked by ad-blockers or privacy-focused browsers like Brave. Make sure to disable your ad blocker when trying out the examples above.
You can protect the client agent from ad blockers by proxying requests through your own domain. We offer a variety of ready-made proxy integrations to choose from. See Custom subdomain setup to get the minimum recommended ad blocker protection.
To identify 100% of visitors with maximum possible accuracy, use one of our cloud proxy integrations. See Protecting the JavaScript agent from ad blockers for more details.
4. Get Smart Signals to your server
Smart signals are actionable device intelligence insights about your visitors. These include IP Geolocation, Bot detection, Incognito mode detection, VPN detection, Browser tampering detection, and many more.
For security reasons, Smart signals are unavailable in the response returned to the client agent. You can securely access them in a server-side environment using Server API, Webhooks, or Sealed Client Results.
For example, to use the Server API:
- Identify a visitor on your client. The response will include a
requestId. - Send the request ID to your server.
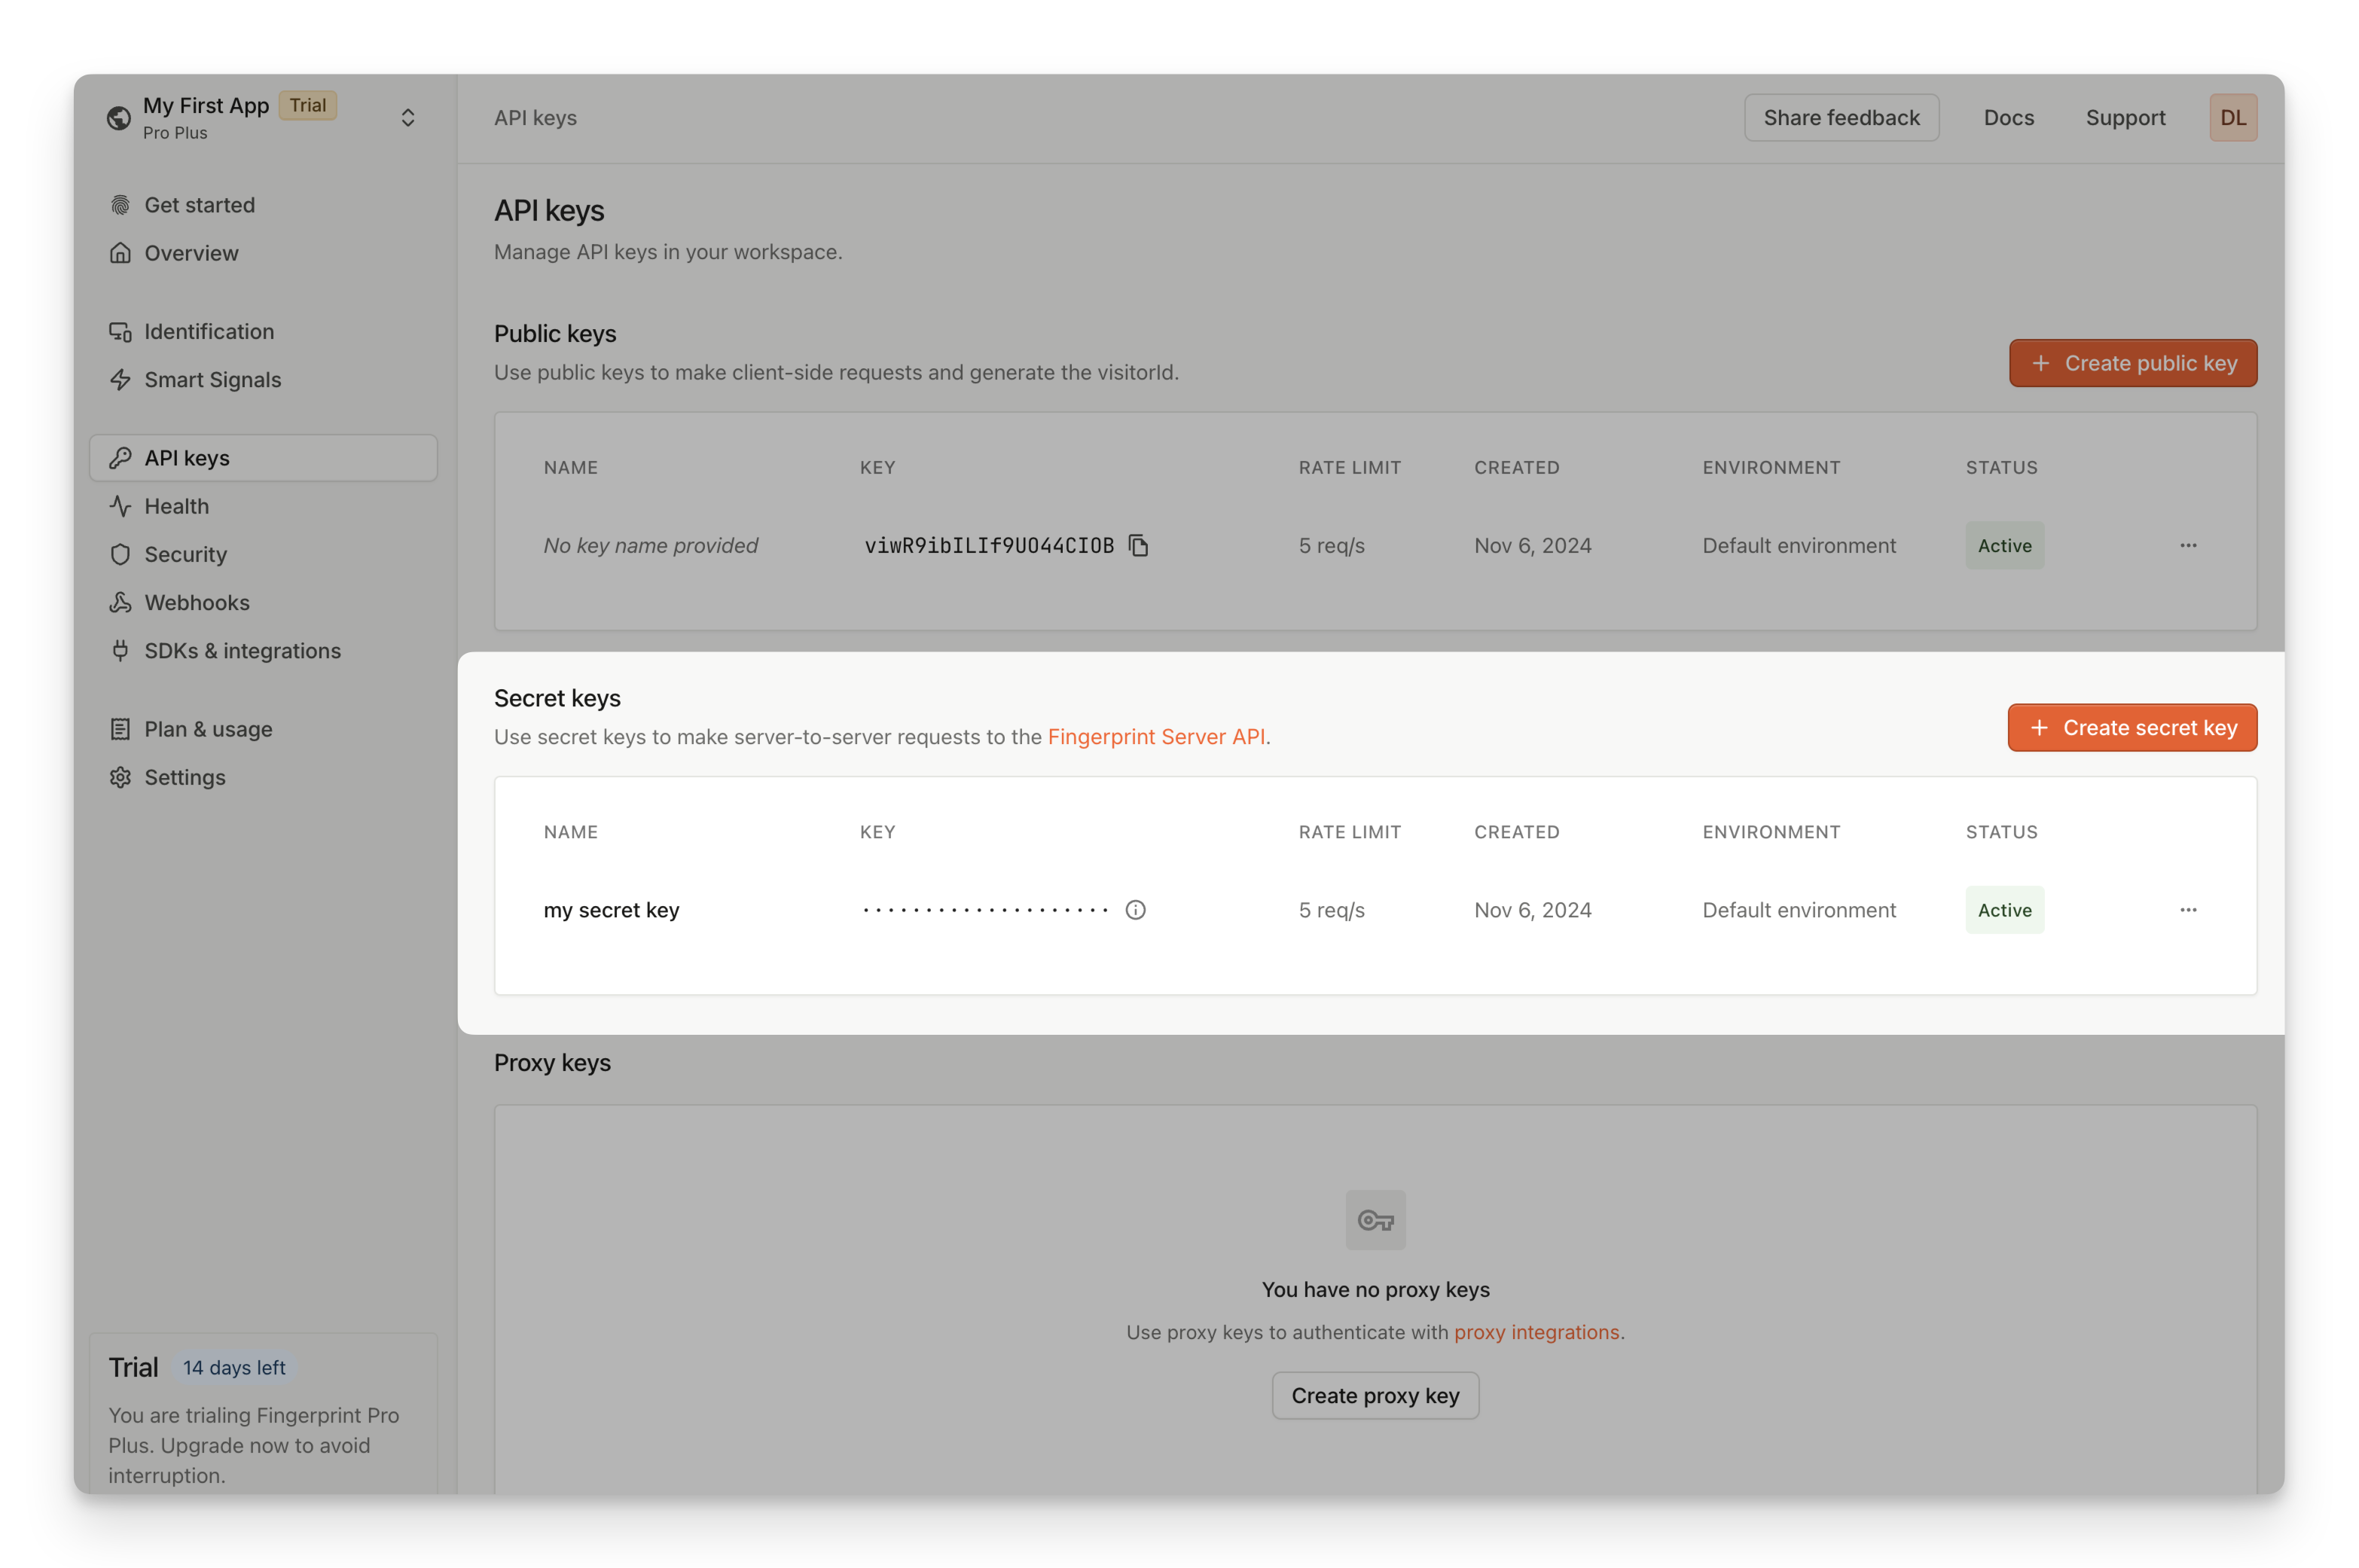
- Use the Server API
/events/<requestId>endpoint to retrieve all information for that identification event, including Smart signals.
curl --request GET \
     --url https://api.fpjs.io/events/<REQUEST_ID> \
     --header 'Auth-API-Key: <SECRET_API_KEY>' \
     --header 'accept: application/json'
{
"products": {
"identification": {
"data": {
"visitorId": "Ibk1527CUFmcnjLwIs4A9",
"requestId": "1708102555327.NLOjmg",
"incognito": true,
"linkedId": "somelinkedId",
"tag": {},
"time": "2019-05-21T16:40:13Z",
"timestamp": 1582299576512,
"url": "https://www.example.com/login?hope{this{works[!",
"ip": "61.127.217.15",
"ipLocation": {
"accuracyRadius": 10,
"latitude": 49.982,
"longitude": 36.2566,
"postalCode": "61202",
"timezone": "Europe/Dusseldorf",
"city": {
"name": "Dusseldorf"
},
"country": {
"code": "DE",
"name": "Germany"
},
"continent": {
"code": "EU",
"name": "Europe"
},
"subdivisions": [
{
"isoCode": "63",
"name": "North Rhine-Westphalia"
}
]
},
"browserDetails": {
"browserName": "Chrome",
"browserMajorVersion": "74",
"browserFullVersion": "74.0.3729",
"os": "Windows",
"osVersion": "7",
"device": "Other",
"userAgent": "Mozilla/5.0 (Windows NT 6.1; Win64; x64) ...."
},
"confidence": {
"score": 0.97
},
"visitorFound": false,
"firstSeenAt": {
"global": "2022-03-16T11:26:45.362Z",
"subscription": "2022-03-16T11:31:01.101Z"
},
"lastSeenAt": {
"global": null,
"subscription": null
}
}
},
"botd": {
"data": {
"bot": {
"result": "notDetected"
},
"url": "https://www.example.com/login?hope{this{works}[!",
"ip": "61.127.217.15",
"time": "2019-05-21T16:40:13Z",
"userAgent": "Mozilla/5.0 (Macintosh; Intel Mac OS X 10_15_7) AppleWebKit/537.36 (KHTML, like Gecko) Chrome/120.0.0.0 YaBrowser/24.1.0.0 Safari/537.36",
"requestId": "1708102555327.NLOjmg"
}
},
"rootApps": {
"data": {
"result": false
}
},
"emulator": {
"data": {
"result": false
}
},
"ipInfo": {
"data": {
"v4": {
"address": "94.142.239.124",
"geolocation": {
"accuracyRadius": 20,
"latitude": 50.05,
"longitude": 14.4,
"postalCode": "150 00",
"timezone": "Europe/Prague",
"city": {
"name": "Prague"
},
"country": {
"code": "CZ",
"name": "Czechia"
},
"continent": {
"code": "EU",
"name": "Europe"
},
"subdivisions": [
{
"isoCode": "10",
"name": "Hlavni mesto Praha"
}
]
},
"asn": {
"asn": "7922",
"name": "COMCAST-7922",
"network": "73.136.0.0/13"
},
"datacenter": {
"result": true,
"name": "DediPath"
}
},
"v6": {
"address": "2001:db8:3333:4444:5555:6666:7777:8888",
"geolocation": {
"accuracyRadius": 5,
"latitude": 49.982,
"longitude": 36.2566,
"postalCode": "10112",
"timezone": "Europe/Berlin",
"city": {
"name": "Berlin"
},
"country": {
"code": "DE",
"name": "Germany"
},
"continent": {
"code": "EU",
"name": "Europe"
},
"subdivisions": [
{
"isoCode": "BE",
"name": "Land Berlin"
}
]
},
"asn": {
"asn": "6805",
"name": "Telefonica Germany",
"network": "2a02:3100::/24"
},
"datacenter": {
"result": false,
"name": ""
}
}
}
},
"ipBlocklist": {
"data": {
"result": false,
"details": {
"emailSpam": false,
"attackSource": false
}
}
},
"tor": {
"data": {
"result": false
}
},
"vpn": {
"data": {
"result": false,
"originTimezone": "Europe/Berlin",
"originCountry": "unknown",
"methods": {
"timezoneMismatch": false,
"publicVPN": false,
"auxiliaryMobile": false,
"osMismatch": false
}
}
},
"proxy": {
"data": {
"result": false
}
},
"incognito": {
"data": {
"result": false
}
},
"tampering": {
"data": {
"result": false,
"anomalyScore": 0.1955
}
},
"clonedApp": {
"data": {
"result": false
}
},
"factoryReset": {
"data": {
"time": "1970-01-01T00:00:00Z",
"timestamp": 0
}
},
"jailbroken": {
"data": {
"result": false
}
},
"frida": {
"data": {
"result": false
}
},
"privacySettings": {
"data": {
"result": false
}
},
"virtualMachine": {
"data": {
"result": false
}
},
"rawDeviceAttributes": {
"data": {
"architecture": {
"value": 127
},
"audio": {
"value": 35.73832903057337
},
"canvas": {
"value": {
"Winding": true,
"Geometry": "4dce9d6017c3e0c052a77252f29f2b1c",
"Text": "dd2474a56ff78c1de3e7a07070ba3b7d"
}
},
"colorDepth": {
"value": 30
},
"colorGamut": {
"value": "p3"
},
"contrast": {
"value": 0
},
"cookiesEnabled": {
"value": true
},
"cpuClass": {},
"fonts": {
"value": [
"Arial Unicode MS",
"Gill Sans",
"Helvetica Neue",
"Menlo"
]
}
}
},
"highActivity": {
"data": {
"result": false
}
},
"locationSpoofing": {
"data": {
"result": false
}
},
"remoteControl": {
"data": {
"result": false
}
},
"velocity": {
"data": {
"distinctIp": {
"intervals": {
"5m": 1,
"1h": 1,
"24h": 1
}
},
"distinctLinkedId": {},
"distinctCountry": {
"intervals": {
"5m": 1,
"1h": 2,
"24h": 2
}
},
"events": {
"intervals": {
"5m": 1,
"1h": 5,
"24h": 5
}
}
}
},
"developerTools": {
"data": {
"result": false
}
}
}
}Note: If you have chosen Europe or Asia as your data region, use
eu.api.fpjs.ioorap.api.fpjs.iorespectively.
You must authenticate your requests to the Server API using your Secret API Key. You can create one on the API Keys page (same as the Public API key). Please allow a minute or two for your API key to propagate before using it.
We support several server-side SDKs to make it easier to work with the Fingerprint Server API and other resources. You can go to the Integrations page and pick your preferred server language.
Try Fingerprint in your browser
Use this developer sandbox project to try Fingerprint in your browser.
What's next
- Not sure Fingerprint is for you? See our Playground, Use cases, or Case studies.
- Questions about how exactly it all works? See the Understanding Fingerprint section, starting with Introduction.
- Thinking through your approach? See Planning your implementation for common best practices.
- Ready to start? See the detailed guide for installing the JavaScript, iOS, or Android agents.
- Get in touch with our Sales team, Support team, or join our Discord server.
Updated about 1 month ago