
AWS CloudFront Proxy Integration v2
Fingerprint CloudFront Proxy Integration is responsible for proxying identification and agent-download requests between your website and Fingerprint through your AWS infrastructure. Your website does not strictly need to be behind CloudFront or run on AWS to use this proxy integration, although that is optimal for ease of setup and maximum accuracy benefits.

Migrating from v1If you are using CloudFront proxy integration v1 and want to upgrade to v2 using CloudFormation without downtime or client-side changes, you can follow Migrating CloudFront proxy integration from v1 to v2.
Improvements over v1
- More robust and secure auto-update mechanism: The v1 update mechanism, relying on CodePipeline and S3 triggers, was broken by AWS changes. The v2 update mechanism is based on Fingerprint sending authenticated HTTP requests to the integration's Management Lambda function. You manually provide the Management function URL and token to the Fingerprint dashboard. Fingerprint stores the token in encrypted form.
- Lower footprint and improved performance: By removing internal dependencies, the shipped Lambda function code has been reduced by 97% to 740 lines.
- Updated Node runtime: The v1 Lambda functions run on Node 16, which AWS is deprecating. The v2 Lambda functions run on Node 20.
LimitationsThis integration is exclusively supported for customers on the Enterprise Plan. Other customers are encouraged to use Custom subdomain setup or Cloudflare Proxy Integration.
Update expectationsThe underlying data contract in the identification logic can change to keep up with browser and device releases. Using the AWS CloudFront Proxy Integration might require occasional manual updates on your side. Ignoring these updates will lead to lower accuracy or service disruption.
The integration consists of several components:
- Your website, which may be running on AWS CloudFront but doesn't have to.
- An AWS CloudFront distribution
- If your website is already running on CloudFront, you can use the same distribution for the proxy integration. This is the recommended setup to maximize the accuracy benefits of the integration.
- If your website is not running on CloudFront, you can create a new CloudFront distribution just for the proxy integration.
- AWS Lambda@Edge Function that handles proxying requests to Fingerprint resources. We will refer to it as "Lambda function" going forward. It is available on a specific path on your site. The rest of your site is not affected.
- Additional cache behavior that enables using a Lambda function for proxying requests.
- AWS Secrets that store settings for Lambda and Management functions.
- If you choose the CloudFormation installation method, the integration also includes:
- Management Lambda function that is responsible for updating the integration. We will refer to it as "Management function" going forward.
- A CloudFormation template and stack responsible for deploying the AWS resources listed above.
The Lambda proxy function code and the entire CloudFormation stack are 100% open-source and available on GitHub. Once the Fingerprint JavaScript agent is configured on your site correctly, the Lambda function is responsible for delivering the latest fingerprinting client-side logic as well as proxying identification requests and responses between your site and Fingerprint APIs.
The benefits of using the CloudFront Integration
- Ad blockers will not block the Fingerprint JS agent from loading. Connecting to an external URL is stopped by most ad blockers but connecting to the same site URL is allowed.
- Significant increase in accuracy in browsers with strict privacy features such as Safari or Firefox.
- Cookies are now recognized as “first-party.” This means they can live in the browser even when third-party cookies are blocked and extend the lifetime of visitor information.
- Insight and control over the identification requests that can be combined with other AWS features like CloudWatch.
- With the CloudFront Integration, you can manage an unlimited number of subdomains and paths. You can package and provide Fingerprint services to all your customers at any scale while benefiting from all the 1st-party integration improvements.
- Cookie security: CloudFront integration drops all cookies sent from the origin website. The Lambda function code is open-source so this behavior can be transparently verified and audited.
- Easy to meet compliance and auditing requirements.
Prerequisites
- An AWS account.
- Optionally: An existing CloudFront distribution that serves your web application.
- If your application does not run on CloudFront, the installation guide will help you create a new CloudFront distribution deployed on the same eTLD + 1 domain as your website, or any of its subdomains.
Integration setup overview
The integration setup consists of several manual and automatic steps. Each step is discussed in detail below.
- Issue a proxy secret in the Fingerprint Dashboard.
- Create path variables used by the AWS configuration and client agent configuration on your website or mobile app.
- Install and configure the integration in your AWS account. You have 2 options:
- Using a CloudFormation template and the AWS user interface.
- Using Terraform.
Finally, configure the Fingerprint JavaScript agent on your website or client application.
Step 1: Issue a proxy secret
Your integration needs a proxy secret to authenticate requests from your Lambda function to Fingerprint servers.
- Go to the Fingerprint Dashboard and select your workspace in the top left.
- Navigate to API Keys.
- Click Create proxy key.
- Name it something like
CloudFront integration. - Optionally, you can choose an environment for the proxy secret.
- By default, the proxy secret works for all environments in your workspace.
- A proxy secret scoped to a specific environment can only authenticate identification requests made with a public API key from the same environment.
- Click Create API key.
- Save the secret value somewhere. You will use it later as the
FPJS_PRE_SHARED_SECRETvariable.
Step 2: Create path variables
Set the path variables you will use throughout your AWS configuration and the JS agent configuration on your website. These values are arbitrary. Just decide what your values are and write them down somewhere.
In this guide, we will use readable values corresponding to the variable names to make it easier to follow:
FPJS_BEHAVIOR_PATH="FPJS_BEHAVIOR_PATH"
FPJS_AGENT_DOWNLOAD_PATH="FPJS_AGENT_DOWNLOAD_PATH"
FPJS_GET_RESULT_PATH="FPJS_GET_RESULT_PATH"
However, your values used in production should look more like random strings:
FPJS_BEHAVIOR_PATH="ore54guier"
FPJS_AGENT_DOWNLOAD_PATH="vbcnkxb654"
FPJS_GET_RESULT_PATH="5yt489hgfj"
That is because some adblockers might automatically block requests from any URL containing fingerprint-related terms like "fingerprint", "fpjs", "track", etc. Random strings are the safest. So whenever you see a value like FPJS_BEHAVIOR_PATH in this guide, you should use your random value instead.
Step 3: Install and configure the integration in your AWS account
You can choose from two available installation methods.
Using Terraform
If you manage your infrastructure as code using Terraform, you can use the Fingerprint CloudFront proxy integration Terraform module. This installation method does not include any mechanism for automatic updates. The proxy function code is updated every time you run terraform apply.
If you prefer the Terraform installation method, continue with Install CloudFront integration using Terraform.
Using a CloudFormation template
If you don't use Terraform to manage your infrastructure, you can deploy the integration inside the AWS Console using a CloudFormation template. This installation method includes a Management Lambda function responsible for keeping your integration up-to-date. You will need to provide credentials for the Management function to the Fingerprint Dashboard to enable automatic updates.
If you prefer the CloudFormation installation method, continue with Install CloudFront integration using CloudFormation.
Configure the Fingerprint JavaScript agent on your client
Use the path variables created in Step 2 to construct the agent-download and result-endpoint URLs.
If your website and the proxy integration are behind the same CloudFront distribution, the JavaScript Agent configuration will use randomized paths inside your domain, for example:
import * as FingerprintJS from '@fingerprintjs/fingerprintjs-pro'

// Initialize the agent at application startup.
const fpPromise = FingerprintJS.load({
  apiKey: 'PUBLIC_API_KEY',
  scriptUrlPattern: [
    'https://yourwebsite.com/FPJS_BEHAVIOR_PATH/FPJS_AGENT_DOWNLOAD_PATH?apiKey=<apiKey>&version=<version>&loaderVersion=<loaderVersion>',
    FingerprintJS.defaultScriptUrlPattern, // Fallback to default CDN in case of error
  ],
  endpoint: [
    'https://yourwebsite.com/FPJS_BEHAVIOR_PATH/FPJS_GET_RESULT_PATH?region=us',
    FingerprintJS.defaultEndpoint // Fallback to default endpoint in case of error
  ],
});
const url = 'https://yourwebsite.com/FPJS_BEHAVIOR_PATH/FPJS_AGENT_DOWNLOAD_PATH?apiKey=<PUBLIC_API_KEY>';
const fpPromise = import(url)
.then(FingerprintJS => FingerprintJS.load({
endpoint: [
'https://yourwebsite.com/FPJS_BEHAVIOR_PATH/FPJS_GET_RESULT_PATH?region=us',
FingerprintJS.defaultEndpoint // Fallback to default endpoint in case of error
]
}));If you set up a separate CloudFront distribution on your subdomain, the JavaScript Agent configuration will use that subdomain to interact with Fingerprint, for example:
import * as FingerprintJS from '@fingerprintjs/fingerprintjs-pro'

// Initialize the agent at application startup.
const fpPromise = FingerprintJS.load({
  apiKey: 'PUBLIC_API_KEY',
  scriptUrlPattern: [
    'https://metrics.yourwebsite.com/FPJS_BEHAVIOR_PATH/FPJS_AGENT_DOWNLOAD_PATH?apiKey=<apiKey>&version=<version>&loaderVersion=<loaderVersion>',
    FingerprintJS.defaultScriptUrlPattern, // Fallback to default CDN in case of error
  ],
  endpoint: [
    'https://metrics.yourwebsite.com/FPJS_BEHAVIOR_PATH/FPJS_GET_RESULT_PATH?region=us',
    FingerprintJS.defaultEndpoint // Fallback to default endpoint in case of error
  ],
});
const url = 'https://metrics.yourwebsite.com/FPJS_BEHAVIOR_PATH/FPJS_AGENT_DOWNLOAD_PATH?apiKey=<PUBLIC_API_KEY>';
const fpPromise = import(url)
.then(FingerprintJS => FingerprintJS.load({
endpoint: [
'https://metrics.yourwebsite.com/FPJS_BEHAVIOR_PATH/FPJS_GET_RESULT_PATH?region=us',
FingerprintJS.defaultEndpoint // Fallback to default endpoint in case of error
]
}));
Parameter URL nuances
- Note that the import
urlfor the CDN installation method andscriptUrlPatternused by the NPM package are similar but different and cannot be used interchangeably.- Pay attention to differences in query parameters:
- Pass region to the
endpointparameters in the following format:?region=eu. The value needs to reflect the region of you workspace.- Leave the
scriptUrlParamparameter as displayed here:?apiKey=<apiKey>&version=<version>&loaderVersion=<loaderVersion>. TheapiKeyversionandloaderVersionparameters will be replaced by the values in the NPM package automatically. Do not alter them manually.
If everything is configured correctly, you should receive data through your CloudFront distribution successfully.
Monitoring and managing the integration
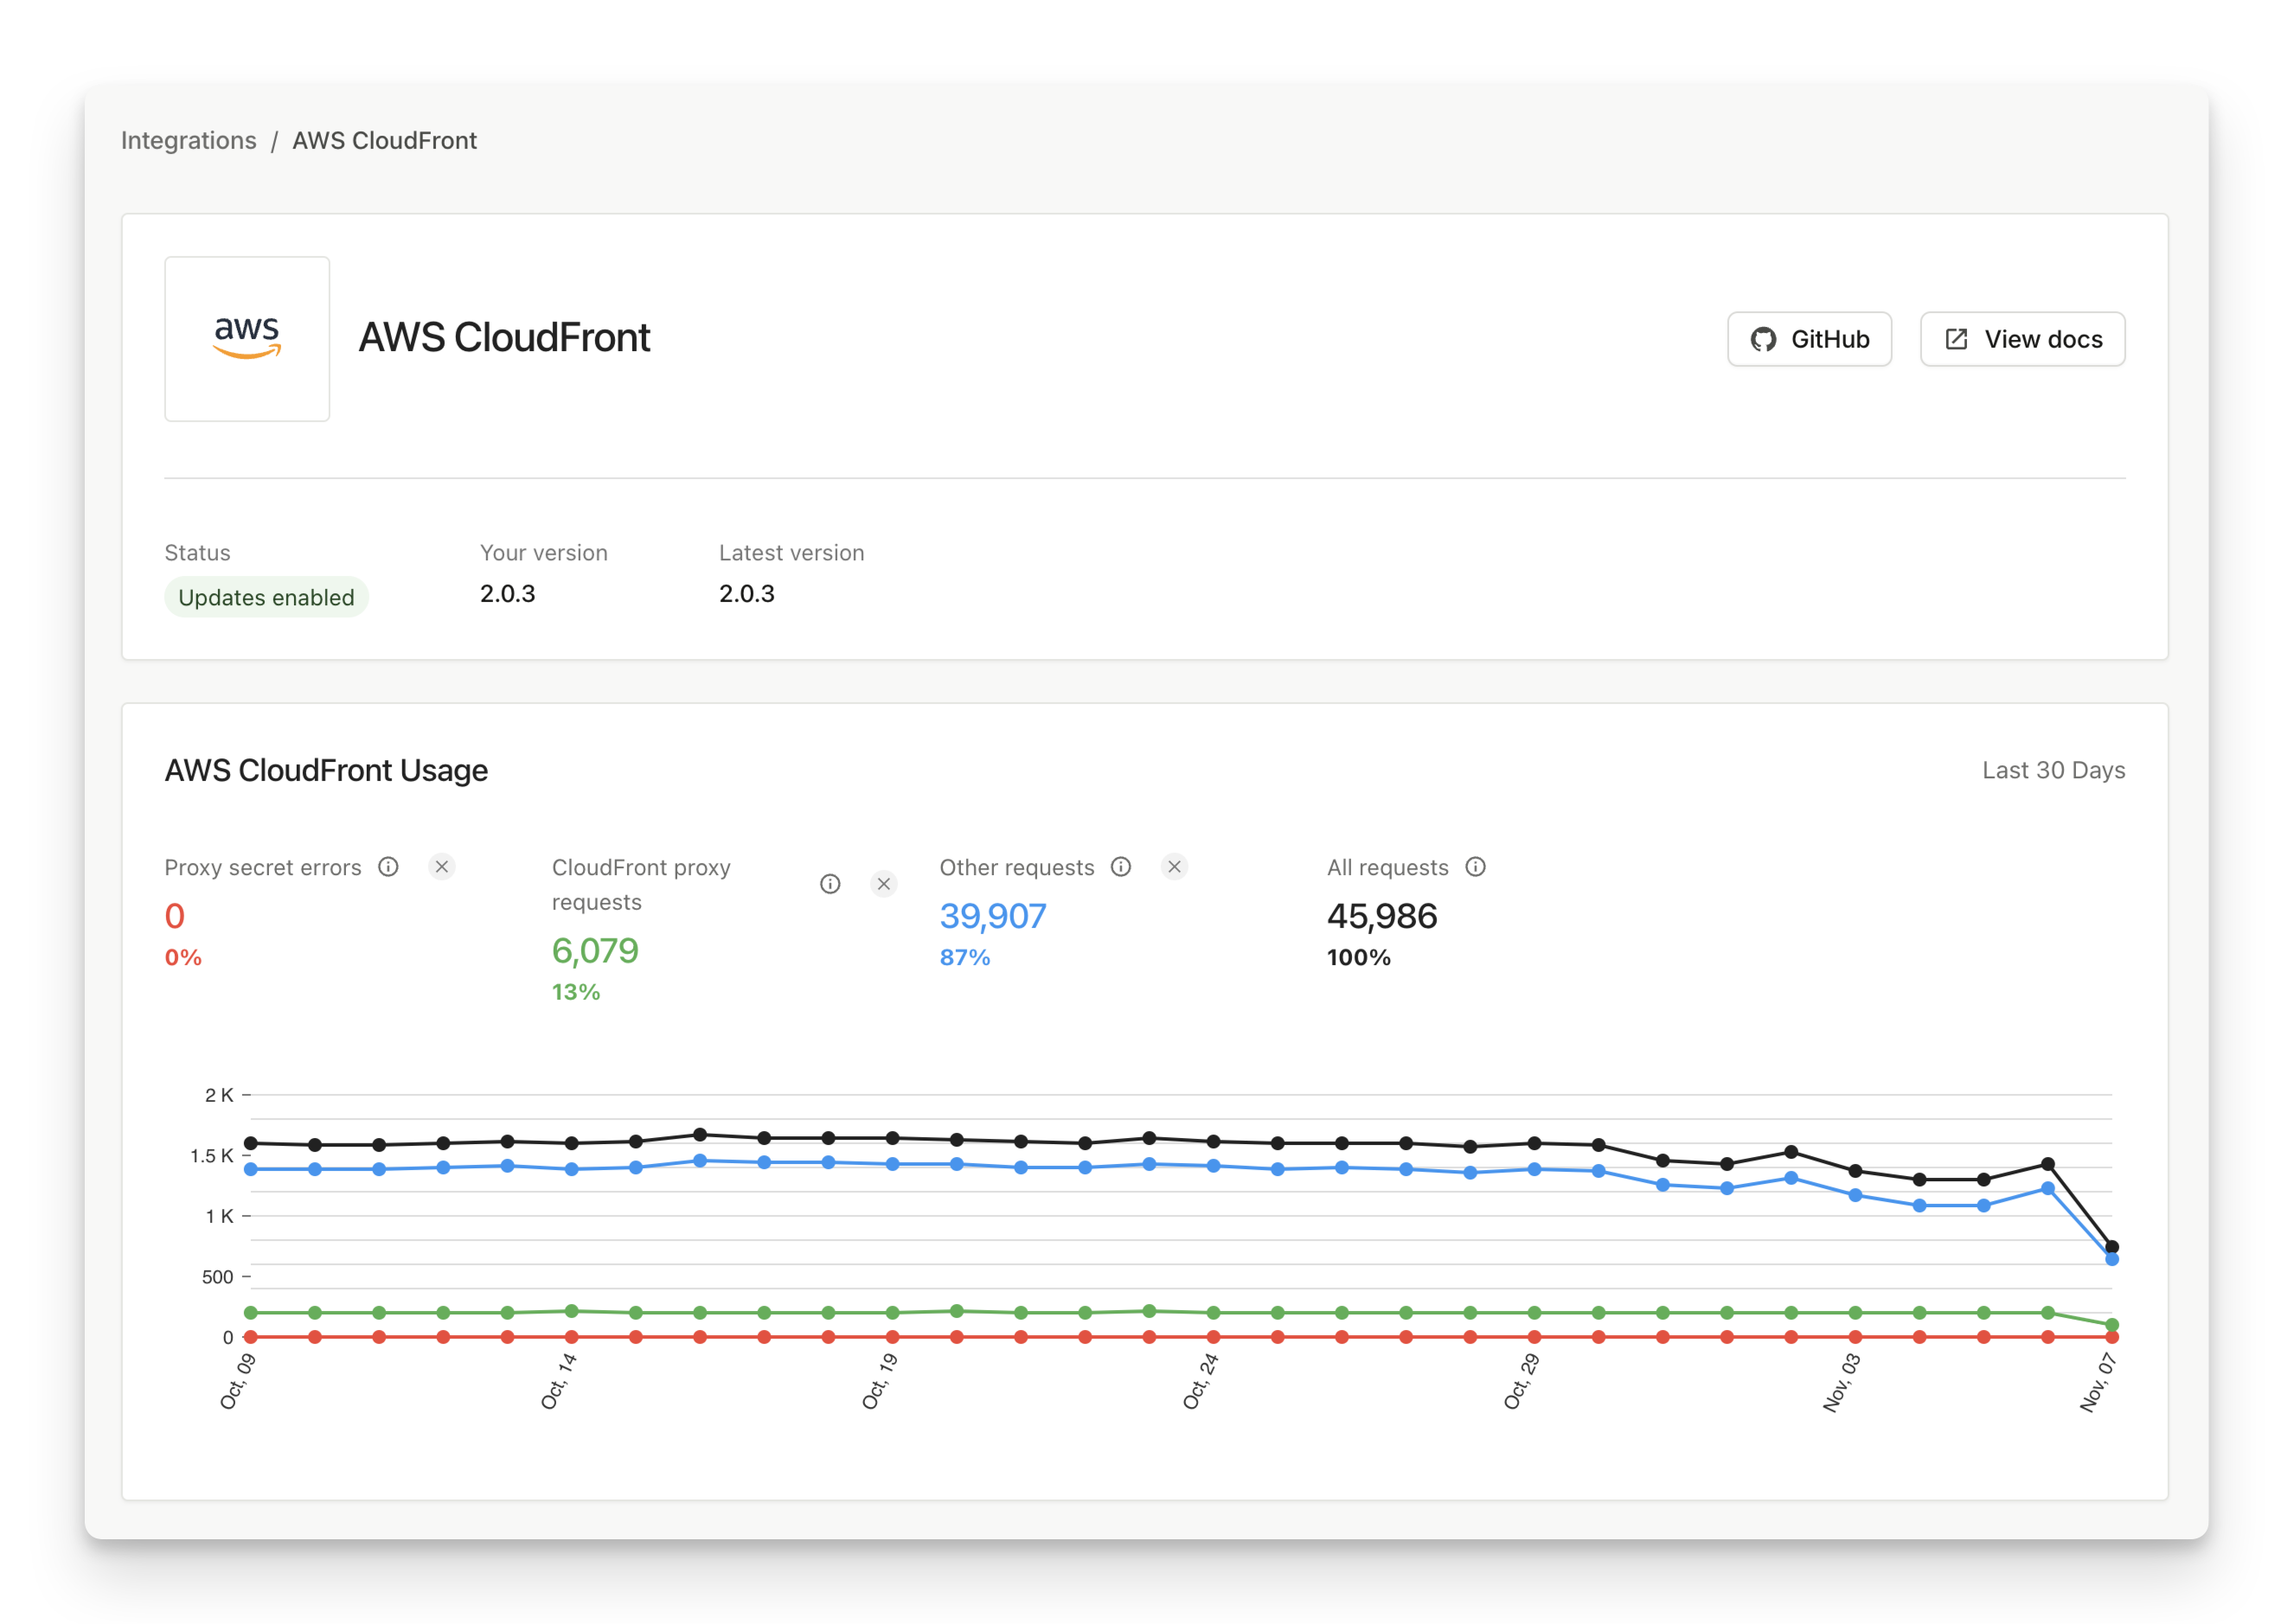
Go to Dashboard > SDKs & integrations > AWS CloudFront to see the status of your integration. Here you can monitor:
- If automatic updates are enabled (only relevant for the CloudFormation installation method).
- If the integration is up to date.
- How many identification requests are coming through the integration (and how many are not).
- The error rate of proxied identification requests (caused by a missing, incorrect, or environment-mismatched proxy secret).
The information on the status page is cached, so allow a few minutes for the latest data points to be reflected.
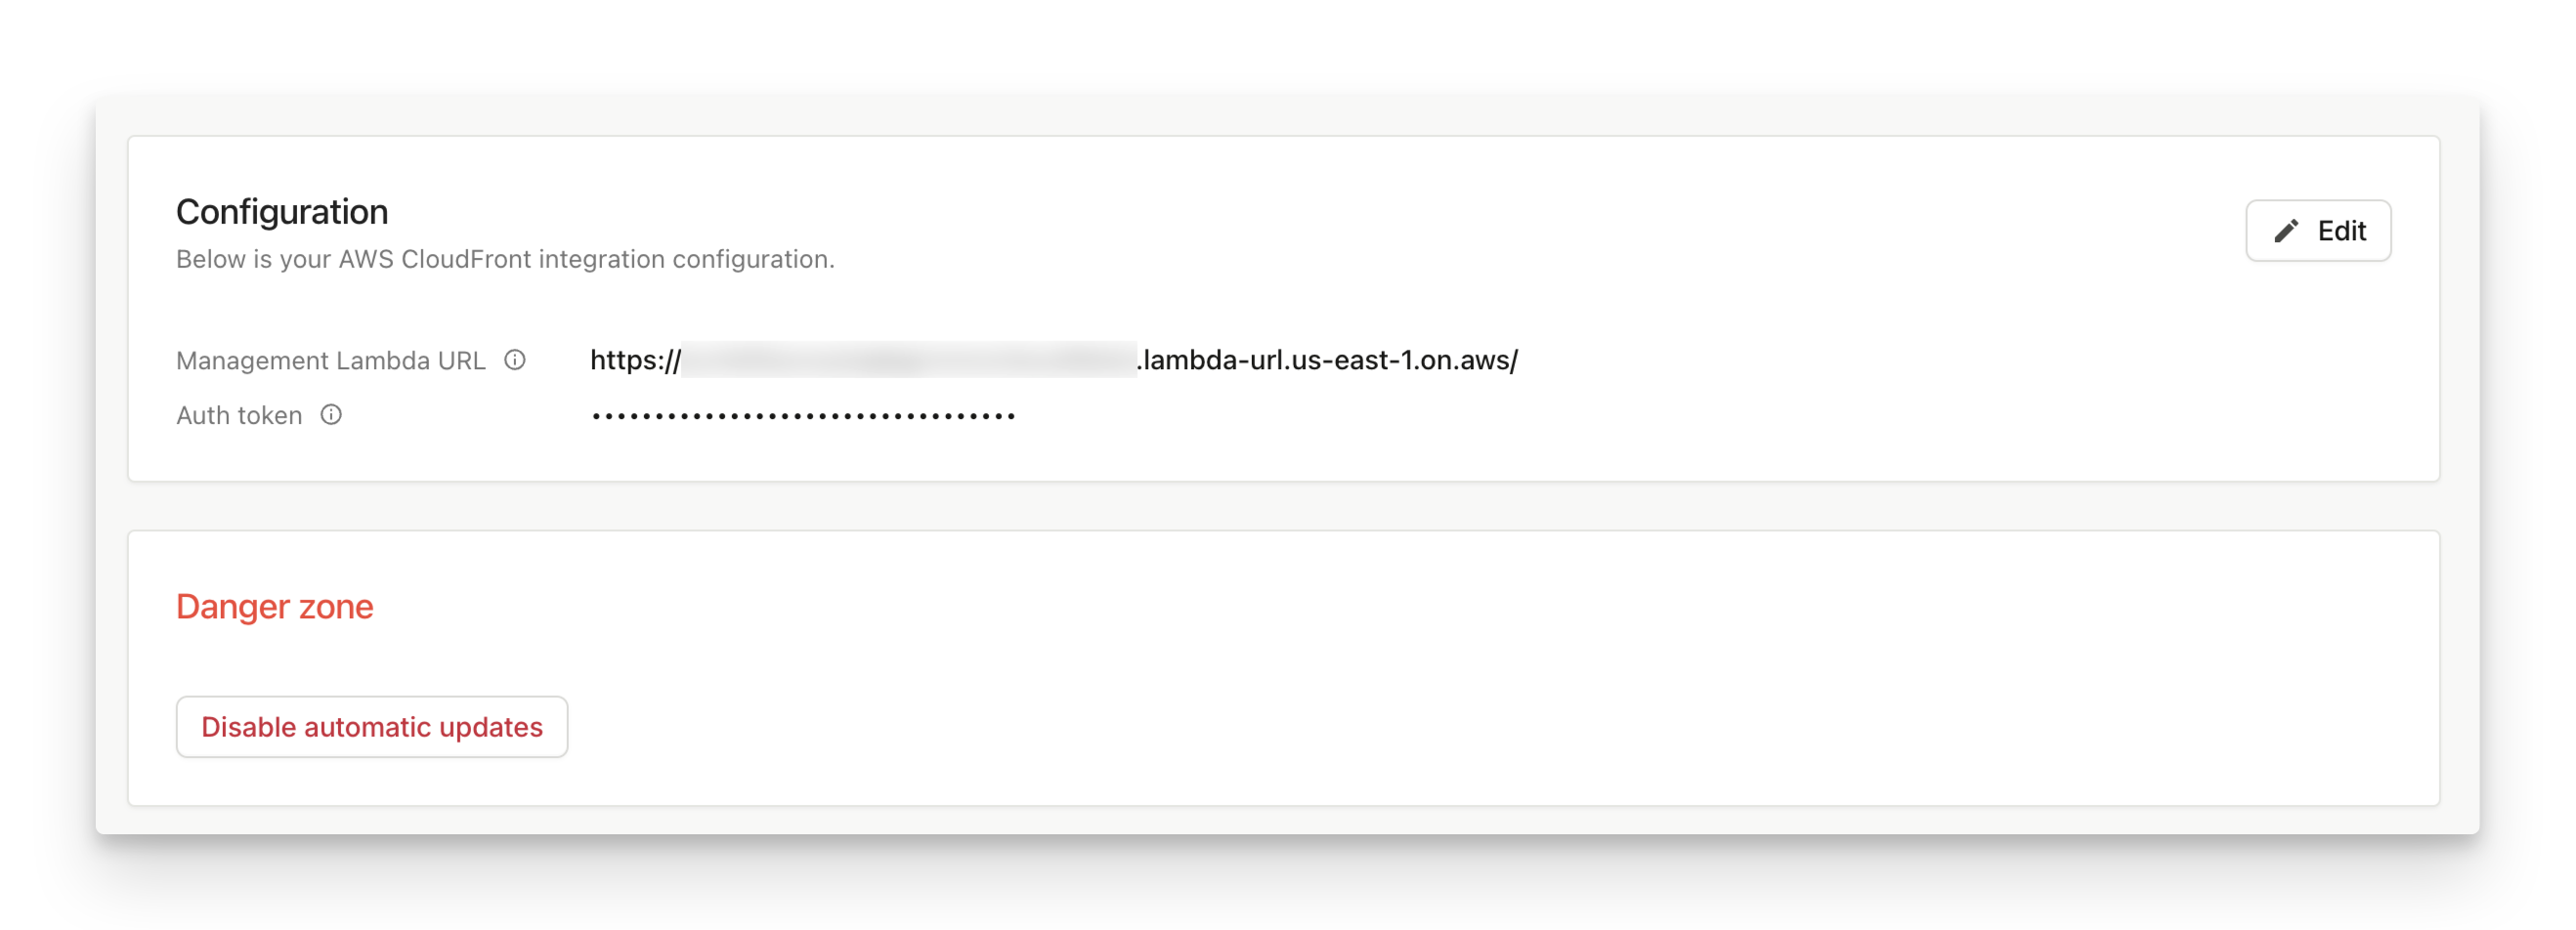
If you installed the integration using CloudFormation, you can also disable automatic updates (not recommended) or update the provided Management function details.
Cost calculation for AWS
You can use AWS Calculator to estimate your expenses.
Lambda@Edge service
- The number of requests is roughly equal to visitor identification events multiplied by three.
There are up to 3 requests for each visitor identification.
- The first request downloads the agent script. This request is typically cached by the browser.
- The second request calls the identification endpoint. Caching the identification request is up to you, but most of our frontend libraries have a caching mechanism built in.
- Potentially, a third helper request may be used to improve accuracy. This request is typically cached by the browser.
- The duration of each request depends on your CloudFront availability settings. The typical duration of the agent download request is 200ms, for identification requests it is 500ms.
- The amount of memory allocated is 128MB.
- The Lambda function has CloudWatch logs enabled.
Secrets Manager
- The number of secrets is 2.
- The number of API calls is approximately 12 calls per hour for each used AWS region.
Additional costs for the CloudFront distribution
- Data transfer from CloudFront distribution to clients:
- The agent’s size is approximately 50-60 KB, depending on the exact version and network compression algorithm used (some browsers may not support
brencoding). - The identification request result is up to 1 KB per request.
- The agent’s size is approximately 50-60 KB, depending on the exact version and network compression algorithm used (some browsers may not support
- Data transfer from clients to the CloudFront distribution:
- The payload size for the identification requests is approximately 5-10kB.
Updated about 1 month ago